Wednesday, February 23, 2011

I'm a grandma

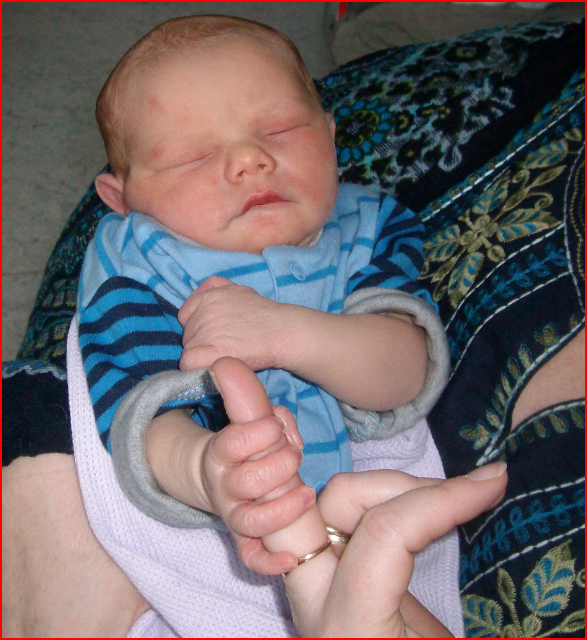
Well my step daughter gave birth to a baby boy, she has called him Olly, he weighed in at 7lb 8oz, and he is just so cute, I am now waiting on the 4th march, so I can fly over to the UK and have a cuddle and meet the little chap. Here he is.... he was about four hours old when this picture was taken.

So I am now called Grandma, way too young to be one, but very proud of my step daughter.

Wednesday, February 9, 2011

AWWW Baby Boy

Just a quick post today as I have lots to do...mainly shopping... but have to fit an hour of crafting in also..


This card I made for Daughter... she is due any day now...although she did find out what she was going to have.. hence the blue for a boy.
The clipart is from.digiwebstudio.com, I just made the card my own.
I added some glitter baby peel offs, and booties which I bought on my last trip back to the UK, and then I made a cute little nappy out of fabric and a safety pin..


Right I had best be off...crafting to do..


thanks for stopping by xx

Tuesday, February 8, 2011

Great Grandma

Well today I have made a card for My Future Mother In Law, as she will very soon be a Great Grandma,  Not sure the other half would like a card making with granddad on, I still think that I am way to young to be called a grandma just yet, but I have been told by Daughter thats what I am..( I have to add that daughter is the other half's daughter not mine, my little girl is still only 8) anyway onto the card.


Here is it, I wanted it to have a old age look, so thought cooker!! your now thinking why cooker.. well the idea was to heat the paper so it turned brown and charred, anyway it took a while to get the look of the paper right, I did manage to set fire to the first sheet, so there wasn't really enough left to actually make the card, but hey practice makes perfect. Then I went onto  good old Google and found the meaning of Grand parents copy paste into word change font etc and click print.... back into the kitchen to play with the cooker once again..


My first idea was to do a silhouette of a lady pushing a old fashioned pushchair, but couldn't find anything to download, so in the end I opted for the Silver Cross pushchair, I changed colors in Photodraw and size of picture etc.

The verse on the front was attached using DST then using foam pads I added the Pushchair, this I made into a decoupage by doing a second layer of the main body of the pushchair, peel offs finished of the card.

Hope she likes it, and it meets to her high standards I am just waiting now for the other half to write a personal verse so I can get that added 

Thanks for stopping by xx


Valentines for the man in my life

Well I finally managed to get the card made for Valentines day, I decided from the start I didn't want to do anything red and black... So I opted for Blue... after a little bit of thinking this is what I came up with. (Lets hope the other half doesn't snoop at the blog before the 14th)

I have to admit I took a picture from Google of the Tatty Teddies.

It is A4 folded in half, with the front of the card cut in half length ways, I then added some hears backing paper and on top of that a pale blue ribbon (the seam hiding behind the hearts)
The tatty teddy heart is 7cm wide, I attached that to a 9cm heart cut out of Blue miri card, the large white heart is 12cm wide. Around the edge of the white card i wrote LOVE YOU for a personal touch, the blue miri card I added small diamonds and also along the ribbon.

The back of the card is visible when closed , I decided to add a string of hearts, each heart is 5cm wide, I used the same paper as I did for the front of the card, and added a larger diamond to the center of each heart.

All I have to do now is write a little msg inside and pop it into his work bag on the 14th.


Thank you for stopping by xx

Wednesday, February 2, 2011

This is just a quick post as I have things to get ready for tomorrow...


This card I made last week for the other half, his boss was leaving so I suggested taking him a card...they all work with computers so I used that as a theme, anyway there it is.


A4 folded in half, the backing paper I found on the internet, it is a picture of inside a computer, something to do with the chip, i just printed it out in black and white rather than the greens and silver.I then found the picture of the pc and printed it out and layered it onto white and black card with silver edge peel off's, the sentiment is just printed via Microsoft word, again layered onto white and black card, in the top right hand corner I used a brad in the shape of a tie, as again they all wear shirt and ties.
Then I left the insert blank so that everyone in the department could then add there own comments etc.


Miguel really liked the card and said a huge thank you, oh and he liked the English Christmas cake also...well I couldn't send a card in without cake to celebrate..


Thanks for stopping by xx

Ribbon and drawer units

Well hello there, it has nearly been a month since I was last on here, and am sorry, time just flies.

On the up side it is only 8 days until my step daughters due date.. and I can not wait, Hopefully meaning a trip to the UK, and a long cuddle with the new grandchild..she has been told it is a Boy, but until he or she appears then we wont know...EXCITED times... I have made a New baby card in Blue ready, and also have the making of a card in Pink just in case. I will get the pictures uploaded so you can see.

I did mention a few post's ago about the ribbon stand the other half made for me, well I have taken a picture so you can see.... how nice is this, I do need to invest in some more ribbon, but have not managed to get to the one shop I have found over here that sells ribbon.
The picture stood on the top is my DAD xx


This is the tall chest of drawers I have all my craft bits in that will fit in...I have to admit I have now taken over another unit in the study.. The other half made this for me also, It was originally made with extra drawers, but they didn't take long to fill.


He also made the desk stood next to it, although out of chipboard, I am in the process of papier mache the sides, I have done the top it is now waiting on varnish to seal. but I need to get the sides finished.


Here is a picture of the top,I have added black and white pictures of family and people close so I can look at them while crafting,

Thanks for stopping by xx